Apple Pay

|
Apple Pay provides an easy and secure way to make payments in your iOS, iPadOS, and watchOS apps, and on websites in Safari. And now, Apple Pay can also be used in Messages for Business and in iMessage extensions. By using Face ID, Touch ID, or double-clicking Apple Watch, users can quickly and securely provide their payment, shipping, and contact information to check out. |
Our Checkout API solution supports Apple Pay out of the box, re-using the existing callbacks. Consider integrating to the Checkout rather than to the Apple Pay flow directly.
- Created Apple Developer account
- Created Apple Merchant Identifier
- Verified domain
- Merchant Identity Certificate
- Payment Processing Certificate
How to create Apple Developer account
- Sign up in https://developer.apple.com/account
- Enroll in Developer Program https://developer.apple.com/programs/enroll/
How to create Apple Merchant Identifier
- https://developer.apple.com/account/resources/identifiers/list/merchant
- Click "+" sign
- Select Merchant IDs and Click Continue
- Fill in Description, Identifier, and click Continue, then Register
- Identifier Format should be
merchant.<reversed_domain> - For example, domain: pensio.com would have Identifier
merchant.com.pensio
- Identifier Format should be
How to verify domain
- Go to your Merchant Identifier
- Select Add Domain
- Complete your Domain, and click Save
- Download the apple-developer-merchantid-domain-association.txt file
- Ask your WebMaster to put the file apple-developer-merchantid-domain-association.txt in https://yourdomain/.well-known/apple-developer-merchantid-domain-association.txt
- Once the file is uploaded, click Verify
How to create Merchant Identity Certificate
- Go to your Merchant Identifier
- Click Create Certificate under Apple Pay Merchant Identity Certificate
- Select Choose File and find merchant-identity-certificate.pem provided by AltaPay
- Select Continue
- Download the certificate
- Send merchant_id.cer to AltaPay.
How to create Payment Processing Certificate
- Go to your Merchant Identifier
- Click Create Certificate under Apple Pay Payment Processing Certificate
- Select Choose File and find payment-processing-certificate.pem provided by AltaPay
- Select Continue
- Download the certificate
- Send apple_pay.cer to AltaPay.
Apple Pay flow
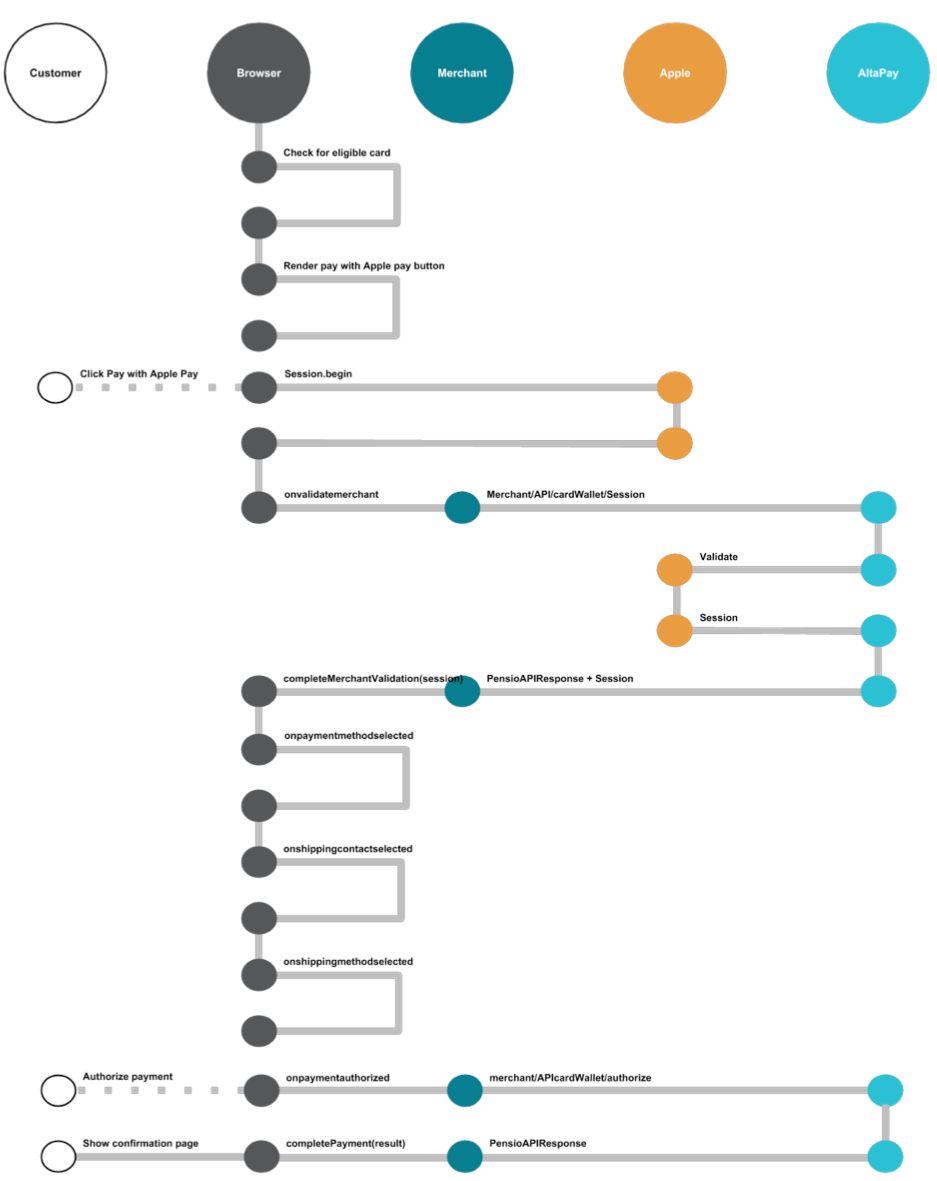
The Apple Pay flow is described in the following diagram. In this diagram you will be able to see the different steps, in the Apple Pay flow.
A simple example of the implementation can be seen in the testshop.

API base url
| Test URL | https://testgateway.altapaysecure.com/merchant |
| Production URL | https://<YourShopName>.altapaysecure.com/merchant |
API/cardWallet/session
This is the step to receive Apple Pay session. By invoking this method we will reach Apple Pay with Merchant key and certificate to retrieve a session which should be used to proceed with Apple Pay payment.
Returned session object should be used in session.completeMerchantValidation(JSON.parse(merchantSession));
API/cardWallet/authorize
This step is required to process Apple Pay data. By invoking this method we will decrypt data with Processing Key and Authorize it against selected acquirer.
Returned response is similar to callback xml.
Specifics for integration using iOS Mobile SDK
The integration is almost identical to the API integration with a few exceptions.
- It uses Swift Components instead of TypeScript Components.
- It does not require validating the session, so there is no need to call /session
- The JSON object returned from ApplePay is one object layer lower than the alternative integration, meaning that it is technically called payment_data, not provider_data. Regardless, it should be passed as a stringified json object in the provider_data request parameter as if there was no difference and AltaPay will take care of it.
Once the customer authorizes the payment, the system calls paymentAuthorizationController(_:didAuthorizePayment:handler:) and that will need to call AltaPay.
Here is pseudo code for what is needed to implement:
    func paymentAuthorizationController(_ controller: PKPaymentAuthorizationController, didAuthorizePayment payment: PKPayment, handler completion: @escaping (PKPaymentAuthorizationResult) -> Void) {

    // Perform basic validation on the provided contact information.
    var status = PKPaymentAuthorizationStatus.success
    // Send the payment token to your server here.
    // Your server should then send the payment token to AltaPay, as specified in https://documentation.altapay.com/Content/Ecom/API/Merchant%20API/CardWallet%20API/methods/authorize.htm
    // Once processed, return an appropriate status in the completion handler (success, failure, and so on).

    self.paymentStatus = status
    completion(PKPaymentAuthorizationResult(status: status, errors: errors))
    }
Test Cases
For testing different outcomes with ApplePay, please check the amount rules in Back-end cases (General)
Common issues during integration
* Base64 data should not include any spaces, that goes for fields such as 'data', 'ephemerialPublicKey' and 'signature'. Spaces should be replaced with the plus sign '+'.
* If using multiple ApplePay accounts, make sure that the terminal certificates and keys in AltaPay's terminal configuration match the certificates on the ApplePay account on https://developer.apple.com/account/resources/certificates/list